Your Story Here LLC
PHOTO REPAIR & RESTORATION
  • Home
    • About Us
    • Gallery
    • Colorizing Photos
    • Testimonials, Reviews and FAQs
    • Firms Trusting Us
  • Photo Repair
  • Photo Restore
  • Nation-Wide
  • Contact
  • The PFR Blog
  • Photo Editing
  • Gallery
  • DIY Photo Resizing
  • DIY Photo Scanning
  • Additional DIY Resources
  • Colorizing Photos
  • About Us
  • Firms Trusting Us
  • Testimonials, Reviews and FAQs

DIY Photo Resizing: 3 Options for Best Results

Picture
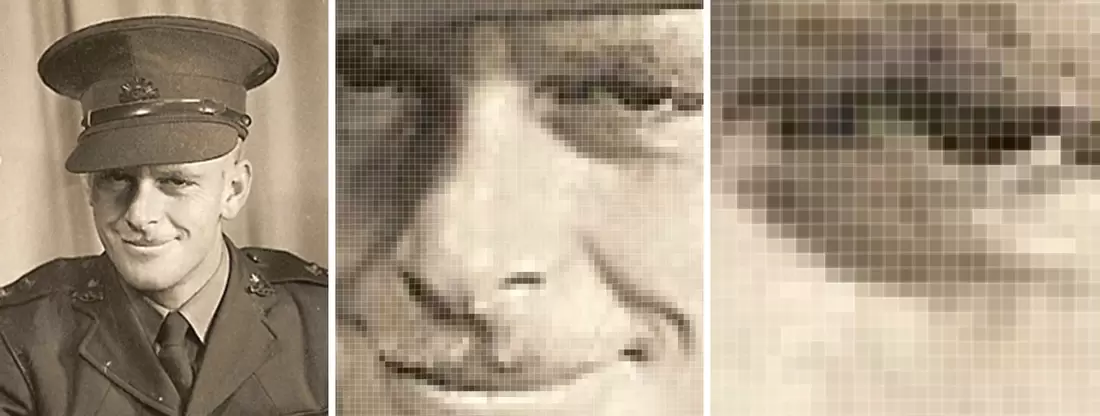
If you use digital images, here are the best ways to enlarge (or shrink) them to ensure that you achieve the maximum potential in the photo, and avoid "stair-steps" and other undesirable artifacts.

What size photo is best?

Enlarging and Shrinking

For screens of any kind, an image around 600 pixels high and/or 600 pixels wide will give you a good looking image. Most of the images in our Gallery are 600 pixels tall. You can use bigger, but it adds to loading time and display delays.

For prints, you need 300 pixels for every inch.  That means that if you want to print at 8" x 10" then you will need an image 2400 pixels by 3000 pixels. You can use smaller, but the picture will likely show stair-steps.

If you want to know the exact pixel size on a PC, just right click and select "properties" and you will see the size in pixels. On a Mac, control-click and select "Get Info".

If you have an image you wish to display on a screen - Facebook or Flicker maybe, or a blog - then you may want to reduce its size so that it's not needlessly large.

If you would like to print an image, then depending where the image came from you may need to increase its size so that it does not show those jagged edges you sometimes see.

On this page we will compare some simple, do-it-yourself options to either increase or decrease the size of your photo to maximize its display quality without using pro-grade image editing software:
  1. Rescan the original;
  2. Resize online; and
  3. Download a resize program.

Digital Photographs:
Sizes and Resolutions
Finally Explained

Every digital image is made up of little, single-color squares called "pixels". And every digital image has an actual dimension or grid size, e.g. "28 x 28".

Look at the image of the soldier on the left - just the portion on the far right. Its size is 28 pixels across by 28 pixels down. You can count them (in this special blow up).  The full portrait on the left? It is 473 x 600 pixels (reduced to fit into the space on this webpage).

What about the file size in kilobytes (KB) or megabytes (MB)? Important right? Not really.  You can mostly Ignore it. Seriously. There is a relationship between the number of pixels and the file size, but it's complicated by things like levels of JPEG (or even PNG) compression - which vary from photo to photo. So ignore file size and concentrate on pixels.

And the photo's resolution - ppi or dpi? You can mostly ignore that too. The question of resolution is seldom ever important when viewing or publishing digital images (screens and websites ignore the resolution and just look at pixel dimensions). However, if you are scanning or printing something you will need 300 pixels for every inch of print you want. Double that (600 dpi) and you double the size of the image when printed.

Moral: Know the dimensions of your photo in pixels!


Photo Resize Method 1: Rescan the Original Photo

Picture
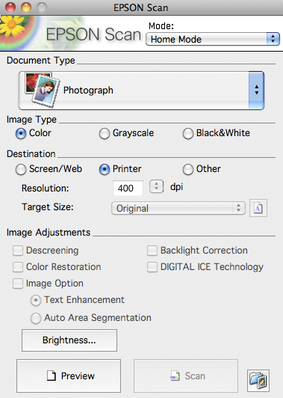
If you happen to have the original photograph, and you are unhappy with the size or quality of the digital image, then rescan at a bigger size. If you plan on printing, rescanning is almost always better than using the computer to get a bigger size.

Make sure you clean the glass and set the scanner to "photo" and "high quality" (or 400 dpi or higher). Click "preview" and adjust those crop lines so you are only getting the photograph. Then "scan" and save as either jpeg or png. If the original image is 6"x4", then at 400 dpi the digital file will be 2400 pixels x 1600 pixels.  If the image is smaller than 6"x4" then scan at 600 dpi. If it's around 8x10 then scan at 300 dpi. And don't be afraid to play with your scanning options - experimentation is the best way to learn!

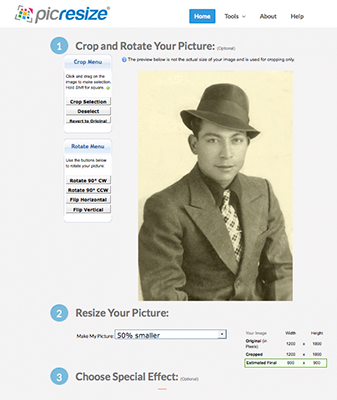
Photo Resize Method 2: Resize your photo online

If you are in a hurry, it is hard to beat online resizing tool "PicResize". Just browse your computer for the image, upload, then choose a resize setting.

You also have other options like batch editing, adding special effects like black and white, "Polaroid", rounded corners, or frames. You can crop and rotate, flip horizontal or vertical, and save in one of four different formats.

PicResize will rename your file, which may be a nuisance, and you will need to endure some ads on the site - but hey, they gotta pay the bills somehow, right? And they don't make you register first or anything like that.
Picture
A note on photo file formats
Some scanners and resizing tools let you choose the file format of the resized photo. What should you choose?

Photo archivists have long recommended saving files in the uncompressed "TIFF" format. And you can't go wrong doing that. But they are large and a lot of applications can't read them.

For images you plan on printing, we recommend the "JPEG" format, using the maximum quality or "minimum compressed" settings. Tests have shown that the human eye cannot distinguish between TIFFs and highest quality JPEGs.

For images you plan on using online and with screens, we recommend the computer-optimized "PNG" format. And if you plan on emailing them or delivering them as attachments or on a flash drive then you can use the Adobe PDF format.

Picture

Photo Resize Method 3: Download a resizing tool

There are some good free choices, and some good paid choices. On the "free" side: "SmillaEnlarger", allows you can drag and drop images from your desktop, zoom in to enlarge, choose a custom size, or fit to a particular aspect ratio like 4:3 or 16:9. You can't change the look much, but you can "sharpen" the image if it's a bit soft (or blurred) and reduce noise.

The Smilla interface (shown left) limits your "save as" options to those that match the file - jpeg or png during our tests. Overall, comparing PicResize and SmillaEnlarger with Photoshop, these two free, easy to use programs came out very well.


What Our Photo Repair and Photo Restoration Clients Are Saying About Us...

"Your work is beautiful. You are the sweetest lady! Thanks so much." Kathleen G

"Our preferred photo restorers." Chemers Gallery

"You have been a treat to work with!"   Sue E.


"The images are beautiful and we are excited to proceed. We appreciate your excellent customer service." City of RSM

"You did such a beautiful job.  My daughter was sooo happy with it."  Diane A.

                                                                                                   More testimonials...

Picture
A Division of Your Story Here LLC,
A California Corporation
Copyright 2022 Your Story Here LLC