 | "A camera is a tool for learning how to see without a camera." (Dorothea Lange) Through our video biography work, and then as a stand alone business, we have fixed thousands of photographs over more than ten years. But even after all these years, I still get tickled when I look at new images that need help: it's knowing that through some digital magic the old can be made new again. It's also that every old photo is a kind of magic peep-hole into the past. Old photos really are the closest thing we have to a time machine. In this blog, I am going to give you the seven quickest and best tricks to restore your old photos. And you can do them on almost any photo editing program - including "Aviary" which Flickr provides, Windows Live Photo Gallery and Photoshop Elements. So, let's get to work! |
1. People Falling Out? Reorient and Straighten
Crooked horizons can be fun, especially if you want to add a touch of zaniness or even intrigue to an image. But, otherwise, it's just plain disorienting in a photo; or worse, your subjects look like they might slide right out of the photo entirely! One of the quickest and most powerful fixes is to adjust the rotation of the image so that the horizon - or the flat surfaces of furniture if you are inside - align with the top or the bottom of the image.
2. Flat Gray Images: Correct Contrast
Some images look flat and lifeless - lots of grays but not much in the way of pure blacks and pure whites. Walden Pond at misty dawn is allowed to be gray, for most other images you want close to the full tonal range - which means you will need to adjust the contrast so that you have at least some absolute whites and some absolute blacks.
If you are using Flickr's Aviary, it's the "Contrast" tool you will need, in Windows Live Photo Gallery its Auto Adjust>Settings>Exposure"; and in Photoshop Elements use Enhance>Auto Levels.
If you are using Flickr's Aviary, it's the "Contrast" tool you will need, in Windows Live Photo Gallery its Auto Adjust>Settings>Exposure"; and in Photoshop Elements use Enhance>Auto Levels.
3. Drab Photos: Crank Up Saturation
Colors lose their luster over time, sun and ozone have a way of leaching the saturation out of images. Sometimes the loss is in one or two color groups; if you are lucky, it is an overall loss of saturation across all the hues in the photograph that can be fixed with a simple movement in your photo editor's
saturation color slider.
In most photo editors, this fix can be found under the "saturation" adjustment. In Photoshop Elements use Enhance>Adjust Color>Adjust Hue/Saturation.
saturation color slider.
In most photo editors, this fix can be found under the "saturation" adjustment. In Photoshop Elements use Enhance>Adjust Color>Adjust Hue/Saturation.
4. Fuzzy Photos: Sharpen
If your photo is out of focus, there is no 100% effective cure. But by careful use of the "sharpen" tool, you can increase the contrast between light and dark pixels at the edges of objects - giving the appearance of a sharper, more focused image. This neat little trick can make up some of the lost ground in a fuzzy photograph - but by no means all.
If you are using Flickr's Aviary, it's the "Sharpness" tool you will need, in Windows Live Photo Gallery there is no tool; but in Photoshop Elements use Enhance>Auto Sharpen or Enhance>Unsharp Mask.
If you are using Flickr's Aviary, it's the "Sharpness" tool you will need, in Windows Live Photo Gallery there is no tool; but in Photoshop Elements use Enhance>Auto Sharpen or Enhance>Unsharp Mask.
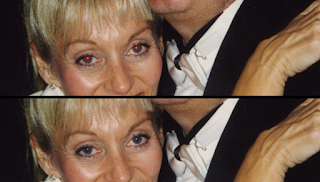 | 5. Flash-Caused Red Eyes We have all had this happen to us: we snap a photo in dark conditions (where our pupils are nice and large to let the maximum amount of light in) and the flash goes off. Great, except that oftentimes the light bounces right back from the back surface of the eyeball, showing a nice red hue (which is pretty much the color of all of our insides). Luckily, easy to fix. If you are using Flickr's Aviary, just click the "Redeye" tool and select the circle size; in Windows Live Photo Gallery there is also a "Red Eye" tool; and in Photoshop Elements use Enhance>Auto Red Eye Fix. |
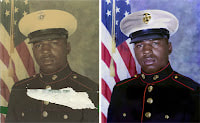
6. Hue Shifts and Color Casts: Color Correction
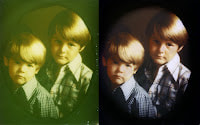
Another common problem with old color photos is a differential loss of color (i.e. not even across all color channels) leading to a color shift or a color cast. Sometimes it was caused by using daylight-balanced film inside under incandescent lights and sometimes it's just color loss. Most photo editing programs give you a good shot at fixing the problem, by examining the overall balance between the red, green and blue color channels and making a correction if there is an imbalance.
If you are using Flickr's Aviary, click the "Enhance" tool, then "Color Fix; in Windows Live Photo Gallery you have a choice between "Auto Adjust" and "Color" where you get to choose a countervailing color shift; and in Photoshop Elements use Enhance>Auto Color Correction or Enhance>Adjust Color>Remove Color Cast.
If you are using Flickr's Aviary, click the "Enhance" tool, then "Color Fix; in Windows Live Photo Gallery you have a choice between "Auto Adjust" and "Color" where you get to choose a countervailing color shift; and in Photoshop Elements use Enhance>Auto Color Correction or Enhance>Adjust Color>Remove Color Cast.
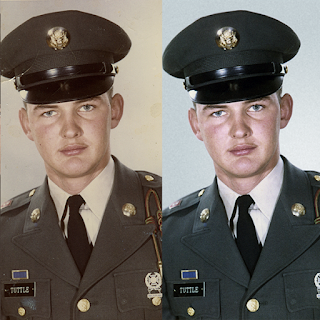
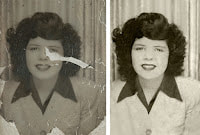
7. Dust, Scratches and Tears
This is really the holy grail in terms of amateur photo repairing - an easy to use tool that fixes dust and scratch marks. Luckily, we have now reached a level of sophistication in our quick and easy tools where these problems can sometimes be fixed by the part-time photo restorer.
If you are using Flickr's Aviary, just click the "Blemish" tool and select the circle size; in Windows Live Photo Gallery the closest you can come is to use the "Noise Reduction" tool (which may not get you where you really want to be). Photoshop Elements is the most advanced of all the amateur programs and it really comes into it's own with dust and scratch repair: start with the Spot Healing Brush tool, or the Clone tool - both available in the tool panel on the left.
I hope these seven quick and easy tool tips help you restore your precious old photos to their former glory. If you would like to see more examples of what can be achieved with old photos just click across to Photo Fix Restore's dedicated photo repair and photo restoration website and check out the extensive before and after gallery!